Half-assed start at fall planting, 2018

When we bought the new place, one of the attractions is the huge 4th floor balcony that comes equipped with a water spigot.  I figured that I could live without a yard, but I do like the idea of a place where I can grow some veggies and flowers and sit outdoors amongst the things I’m growing. 
So, I just wasn’t organized enough for much of a fall garden, but I did have most of a bag of potting soil and a bunch of empty pots salvaged from the old house.  And I also had a basket of seeds, all of them at least a couple of years old.  So, last weekend I thought it would do no harm to toss some soil into pots and throw in some seeds.  If the seeds are any good, I can transplant them into bigger pots and have a fall garden; if they’re no good then I’m no worse off than if I’d just tossed them.
So this morning, I saw the first tiny sprouts, in the pot labelled “Pak Choi”.  Which is a seed I bought on a whim because I think that ingredient is tasty, but I don’t know much about growing it.  So, time to start researching and documenting!  And time to try to develop a standard format for whatever else grows…

So for my standard format, I figure I’ll do two types of posts:  journal posts which show what’s happened on a particular day (e.g. a list of what I planted/maintained/harvested and how) and research posts which will focus on a particular plant, technique, pest, etc.  In the research posts I can reference the relevant journal posts to show my ongoing experiments with the thing.  

So what did I plant?  
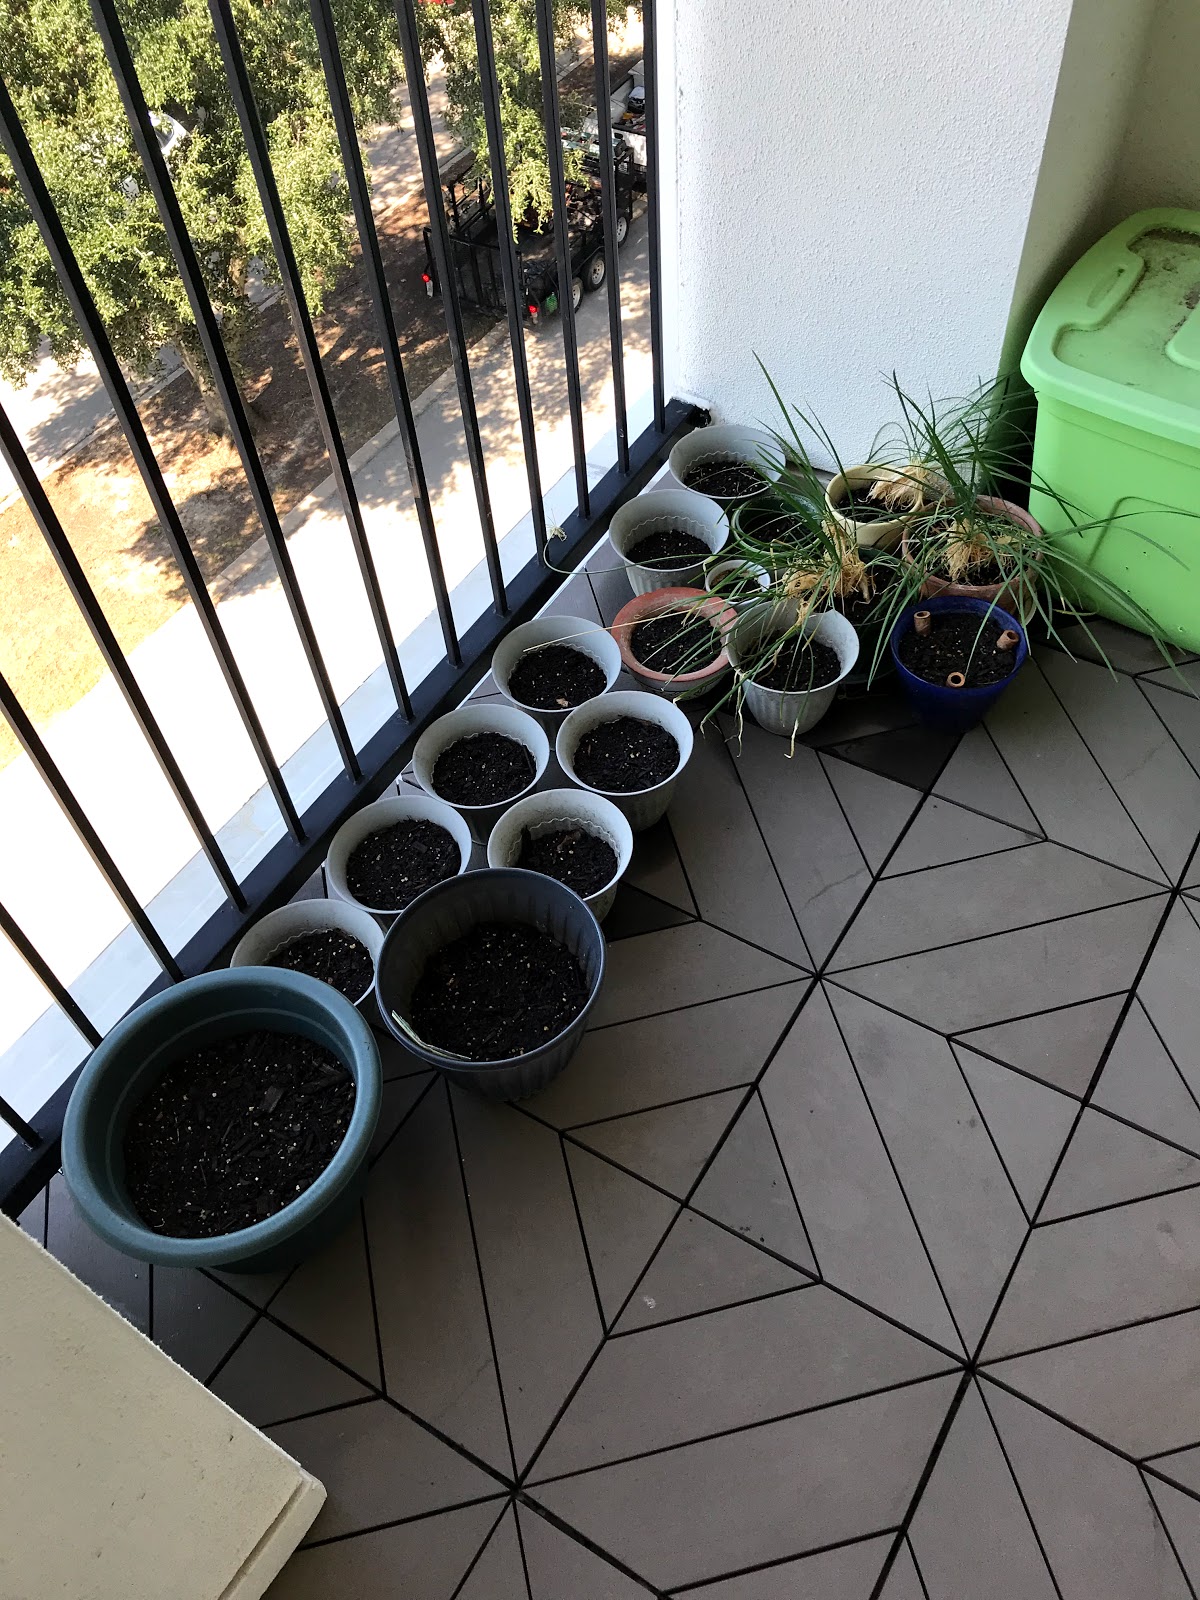
1.  Oat Grass for the cats – since I’d like this to grow in the pot I planted it in, indoors, I used a mid-sized ornamental pot.  Scattered the seed thickly and covered with about a 1/4″ of soil.
2.  Chives – didn’t actually plant these, just took a pot that’s been growing for several years and is starting to look rather peaked, and divided it into three different pots.  Hopefully that’ll encourage new life.  If they grow well, I might put some in with other things for companion planting or I might just give a couple away.
2.  Lettuce – I had a mixed packet of different types of seed, some of which was quite old, and I filled a somewhat bigger pot and scattered the stuff rather thickly across the whole surface and barely sprinkled some soil over it.  I figure that germination is likely to be very low rate.  If it grows more thickly, I might have to thin or transplant.  But, more likely I’ll be lucky to get just a few plants.
3.  Broccoli, kale, and Pak Choi, each in a separate container.  Each planted quite thickly, if it comes up I’ll need to transplant the seedlings to grow to full size.
4.  Swiss chard – a sprinking of different types, a mix of standard green chard and five-color silverbeet.  Again, seeds very old, sprinkled very thickly and assumed low germination rates and plan to transplant if any germinate.
5.  Herbs – savory, parsley, thyme, rosemary, oregano.  Planted in small pots, if they grow I’ll figure out what to do with them.

If they grow, I have a couple ideas for what to do with them.  I have a small supply of larger pots.  I also have a bunch of plastic crates I used for moving.  For the plastic crates, I was thinking of trying to devise some sort of self-watering setup – like, instead of drilling holes in the bottom, I would somehow create a water space at the bottom, maybe using old cans or something to prop up the soil, then use cotton rags (?) to wick up the water to the soil layer.  Will have to research options fairly quickly if I’m to use that this growing season.  More likely, this season will just be big plastic pots from the dollar store or big lots.  

The worst part will be hauling bags of soil to the 4th floor!


Cooking journal: Stromboli and pizza

More experimenting with making a good dough for yummy comfort food.

So I had a couple of things going on here, to test.  The first was to compare the store-bought dough available at my local HEB to my own dough, to see if I noticed any difference.  The second was to try a couple different kinds of options – quick-bake pizza versus a wrapped style like Stromboli.

My dough recipe for this set of experiments was:

  • 3 cups flour
  • 1 TBSP sugar
  • 1 ½ tsp yeast
  • 1 tsp salt
  • 1 1/3 cup water
  • 1 TBSP olive oil
I mixed these up and divided the dough into two oiled ziplock and tossed them into the fridge to rise for a couple of days.  The commercial dough sat in the fridge for the same couple of days, so it could fully thaw.

For the Stromboli, I sautéed a pound of sliced mushrooms.  I also sautéed a box of frozen spinach with 3 tsp chopped garlic, a generous sprinkle of nutmeg, and a sprinkle of black pepper.  Once it was fully hot I spooned it onto some paper towels to drain and cool.  Before adding it to the Stromboli I squeezed it to get rid of as much water as possible.

I made two Stromboli – one from my own dough (half of the recipe above) and one from the commercial ball of dough.

Preheated the oven to 400.  Rolled the dough out into a large square – about 10×12 inches, which made it a bit less than half-inch thick.  I laid out a thin layer of provolone, leaving a bit of dough uncovered on sides and ends.  on top of that I spread out the mushrooms and spinach.  Rolled the thing up, pinched to seal the ends and edges, set it on parchment paper, slashed the top every couple of inches.  Then baked it for 28 minutes on my hot pizza stone (just slide parchment paper onto and off of the stone).  

Served with jarred marinara.

Result:  The commercial dough came out better than the homemade.  I think because the commercial one had slightly more volume?  The homemade one seemed to take longer to cook and didn’t brown up as nicely.  Also, these came out ENORMOUS.  I cut one in half to feed both of us, and it was a large meal.  So the other got left for another night and it wasn’t quite a good on re-heating.  So in future – make  only one at a time, or serve more people at once!  

These were tasty and I should probably do them again sometime. 🙂

For the pizza, I divided the dough into two, rolled out each piece to about 1/2 inch thick, let it rise on a piece of parchment paper while the oven with a stone in it rose to 450.  Then slid the parchment paper onto the stone, baked for 10 minutes, removed and added pizza sauce (Classico), mozzarella, and pepperoni.  Slid back into the hot oven for another 5 minutes.  

These were fine.  I think I used too much sauce, so they were kind of messy.  

The pizza dough recipe above comes out a little bland.  

Conclusion:

I’m not at all sure that the extra effort to make my own dough is worth the result in flavor.  The commercial stuff tasted just fine, wasn’t real expensive, and was easy to use.  

Cooking notes: Pumpkin Chili

This is adapted from this recipe – I thought that the idea of thickening the chili with pumpkin had potential.

Ingredients
2 pounds ground turkey
1 lb dried large red kidney beans
2 – 14 oz cans pumpkin puree
3 – 14 oz cans crushed or diced tomatoes
4 cups water
1.5 cups frozen chopped onion
1 cup frozen green bell peppers
2 cloves garlic, diced – large spoonful of pre-diced
3 teaspoons cumin
3 tablespoon chili powder – to be honest, I just dump it in, it’s probably more than that.
2 teaspoons dried oregano

Method
1. Set pot to saute.  When hot, brown  ground beef. Brown meat. Add diced onion, diced green pepper and garlic. Stir until the onion is fully thawed.
2.  Add kidney beans, pumpkin puree, water, cumin, chili powder, dried cilantro and dried oregano. Stir well. Switch pot to pressure cook and cook for 30 minutes
3.  Natural release for at least 10-15 minutes, check for done-ness.  When done, add tomato and then adjust seasoning to taste. 
Serves 8 for 395 kcal/serving

Result:  This made very large servings if divided into 8.

The result was palatable but bland.  The pumpkin thickened the chili but you really couldn’t taste it.  It needed salt and more spice.  And perhaps something acidic – vinegar or lemon juice – to bring out flavor.  Adding cheese helped a bit, likely because it added salt.

I’d do something like this again but would maybe cut the amount of pumpkin down (in half maybe) and would add more salt, more seasoning, and something acidic to bring out the flavors more.  

Ropa Vieja in instant pot

This was a combination of several different recipes.

2.7 lb beef flank steak
salt and pepper
1 cup frozen chopped onion
4-5 cloves garlic
1 cup beef broth
1 can diced tomatoes
2 cups frozen bell peppers (the ones Keith got were all green peppers)
1/2 tsp oregano
1 tsp cumin
1 bay leaf
1/4 cup parsley flakes
2 tbsp white vinegar

Season meat with salt and pepper
Preheat instant pot on saute mode, then sear steak on all sides and set aside.
add onions and garlic, cook until soft.
Add broth to deglaze
Add tomatoes, peppers, oregano, cumin, bay, then put meat back in
pressure cook on high for 40 minutes
10 minutes natural release
remove meat to plate, shred with forks.
blend sauce with immersion blender
mix in parsley and vinegar.

Result:  Flavor was nice.  I would’ve preferred to have the mix of red, yellow, and green bell peppers instead of just green.  there was way too much liquid in the pot.  Next time, I think I can skip the beef broth and just go with the liquid from the can of tomatoes and that released from the onion, peppers, and meat.

Cuban style black beans with brown rice

1 lb dry black beans
3 cups water
1/2 cup chopped onion
2 cloves garlic
1/2 tsp cumin
1 tsp salt
2 bay leaves
2 tsp Worcestershire

Add all ingredients to pot and pressure cook 22 minutes
natural release at least 10 minutes
blend or mash a bit to thicken juice

Results:  Nice.  A bit bland.  Consider cooking in broth instead of water.  Or adding a bit more seasoning – oregano, maybe?  There wasn’t a ton of liquid, I prefer a bit more to soak down and flavor the rice.  Maybe would add an additional 1/4 to 1/2 cup water next time.

Brown rice – 2 cups rice to 2.5 cups water, add a spoonful of bacon fat for flavor, pressure 23 minutes on high.

Tuscan chicken pasta

based on this recipe.

4 boneless skinless chicken breasts (mine came out to 2.07 lbs)
splash cooking oil
dash salt and pepper
2 tsp paprika
1 cup chopped frozen onion
1 tsp basil
Garlic powder
1/2 tsp oregano
1/2 tsp thyme
dash red pepper flakes
4 1/2 cups chicken broth (used BtB)
1 cup milk
14 oz penne pasta
8 oz cream cheese
1 1/2 cup grated parmesan (used the dry kind, not fresh-grated)
4 oz dried sun-dried tomatoes
several large handfuls (about 4 cups?) fresh spinach and baby kale

Rub the chicken breasts with salt, pepper, paprika
Preheat pot on saute, then add dash of oil and sauce chicken (in batches) until browned on all sides; set aside.
add onion, saute until soft
add broth, seasonings, milk, pasta, and lay chicken on top.
Pressure cook for 5 minutes.
Quick release pressure
Remove chicken and set aside.
Stir in cream cheese until softened and fully distributed
Stir in parmesan, tomatoes, and spinach.
Chop chicken into bite-sized chunks and stir back in.

Result:  Tasty.  Made a lot – I divided into 8 portions which were a generous one-dish meal.  I froze some portions and they thawed and reheated just fine.  Keith seemed to like quite a bit.  If I made it again, I might try mixing in some additional veggies?  Some diced red/orange peppers, maybe.

Lemony Lentil Soup

This came from https://www.gimmesomeoven.com/lemony-lentil-soup/ with some variation.

Splash of cooking oil (recipe recommends olive oil)
1 cup diced carrot
1 cup diced onion (I used frozen chopped)
5 cloves minced garlic
6 cups veggie stock (I used Better than Bouillon)
2 cups red lentils (14 oz bag)
2/3 cup corn (I used frozen)
2 tsp cumin
2 tsp curry powder (recipe said 1.5, I screwed up and read wrong line and put in 2)
pinch saffron
pinch cayenne
2 tbsp lemon juice
(recipe recommended lemon zest but I didn’t have on hand)

Heat pot in sauce mode; when hot, add a splash of oil and cook onions and carrots in them for 5 min or until onion is soft.  Add garlic and sauce for another minute or so.  Add all other ingredients except lemon; pressure cook for 8 minutes.  Allow natural release for at least 10 minutes then open.  blend a bit with immersion blender to create a creamy texture.  Stir in lemon juice.

Results:  Not bad.  A bit too intense, flavor-wise.  Maybe make a weaker broth base next time, and cut back a touch on the curry powder.  Also maybe up the lemon or add in lemon zest next time.  The texture was quite thick, especially on reheating.  I think it might be good to add a bit more liquid to have more of a soup-like texture.

For next time:
Acquire lemon zest
Add 2 cups additional water
use a bit less curry powder

Closet thoughts

I have a LOT of clothes. I have a considerably smaller set of clothes that I truly love wearing. Reasons why I don’t wear clothes are varied:

  • Too small
  • Too big
  • Damaged or worn
  • Not flattering
  • Not my aesthetic anymore
  • Nothing to wear it with
  • Inconvenient to wear:  no pockets!
Meanwhile I find myself craving new clothes even though my enormous, privileged, first-world closet is pretty full now. 
And, I have a yen to do some sewing. 
So I have this idea I will try to narrow down my closet to a smaller subset of clothes – things that meet all the following criteria:
  • Fits well and in good condition
  • Has something it will go with (which hasn’t already been tabbed as going with some other outfit)
  • I enjoy wearing it. 
Then I will see if that is enough clothing or still have too much… I would define “enough” as at least a week or two of outfits for a category like casual, formal work, casual work, etc.  I guess I would define “too much” as more than a month of same?  Also need to consider summer and winter. 
From there, I would like to start building “capsules” (as seen on the internet) of clothing that can be recombined into different outfits. So for trips, could just grab a capsule or two and be ready to go. But that level of organization would also require some planning for maintenance – 
  • Do I store capsules together rather than sorting clothes by type as I do now?
  • How to remember what goes in which capsule?
  • How to maintain the capsules through the laundry cycle?  (Sew in grranimals tags?)
Rejected clothes will largely go in my growing pile of things to try to refashion, so I can get creative without spending a bundle!
So, here goes. Going to post now as a commitment to myself!

Beef Stroganoff in the Instant pot

Not a truly authentic one since I used stew meat cut in chunks – I gather the truly authentic recipe would use flank steak cut in strips?

Beef Stroganoff
          Dash of canola oil
          1 tbsp butter
          2 – 2.5 lb beef stew meat, cut into 1-inch cubes – mine was barely 2 lbs
          1 ½ cup chopped onion (frozen or fresh) – used frozen
          16 oz baby bella (cremini) mushrooms
          1 1/2 cups beef broth –  used BTB beef
          2 tbsp flour
          1 tbsp dried minced garlic
          2 tbsp worcestershire sauce
          1 tsp salt
          1 tsp black pepper
          ½ tsp dried thyme
          ½ tsp parsley flakes
          ½-1 cup plain greek yogurt – used a full cup and more
          Barley or noodles, cooked separately – did barley, which worked out great.
Mix flour with seasoning (salt, pepper, garlic, thyme) and then toss with meat to coat the meat.
Turn on pot to saute setting.  When hot, add oil and then saute meat until brown; remove to plate.
Add butter to melt, then add onions; cook until starting to soften.
Then add mushrooms, cook until reduced in size by half.
Add broth and Worcestershire sauce, make sure bottom of pan is deglazed and then add meat back in
Set pot to manual, high pressure, for 15 minutes.  Allow 10 minutes pressure release.
Turn to saute.  
If very runny, suck up some broth and mix it with 2 tbsp cornstarch, stir into sauce with setting on saute to thicken.
In a separate measuring cup, stir some broth into your yogurt until soft and creamy.  Then add to pot and stir until sauce is nicely thickened.
Barley – in separate batch – ratio is 1:2.5 which is about the most water I’ve seen in any recipe.  I think I did 22 or 23 minutes.  


Result:  there was definitely too much broth, so it required corn starch to thicken.  And then, it was maybe too hot?  Because even though I mixed broth into the yogurt separately first, it still separated when I added it to the broth.  And then I kept adding more yogurt in hopes of fixing it and the new stuff kept separating also.

Despite that – it tasted really good.  Rich and a bit tart just like it’s supposed to.

Next time, I will cut back the liquid a little so maybe we won’t need the corn starch.  After some googling, I think the dairy separation was due to the yogurt being cold and the beef broth being boiling.  I will try to prevent the separation of the yogurt at the end by setting the yogurt out to come to room temperature when I start the beef to cooking, put the yogurt in a much bigger container and mix a lot more of the liquid into the yogurt a bit at a time in the separate container, and perhaps let the whole mess cool a bit before I add the yogurt.  

The barley ooked up nicely, though it was a bit sticky – I didn’t rinse it first, that probably would have helped.  And I think I like the combo of stroganoff and barley better than over noodles even.  Yum!


Chicken Tikka Masala in the Instant Pot

This was, once again, a consensus recipe composed of several online sources. I should really capture the sources and credit them, but I forgot to do that.

Marinade
·         2 lb boneless skinless chicken (breast or thighs) – I had a bit under two pounds of boneless skinless breast tenders.
·         1 – 1 ½ cup plain greek yogurt – used 1 1/2
·         3 tbsp lemon juice 
·         1 ½ tbsp garam masala
·         2 tbsp dried ginger
·         2 tbsp dried garlic
·         1 tsp ground coriander
Sauce
·         Splash of oil
·         1 cup diced onion – used frozen chopped
·         2 tsp minced garlic
·         2 tsp ginger paste
·         1 tsp paprika
·         1 tbsp garam masala
·         1 tsp turmeric
·         1 tsp corander
·         1 tsp cumin
·         1 can (14 oz) diced tomato
·         1 can tomato sauce
·         ½ cup chicken stock
·         1 1/2 cups half and half.  I ended up using a “fat free” product I bought by accident.
Basmati Butter Rice 
·         16 ounces basmati rice (white)
·         2 cups water
·          3 Tbs butter
·          ¼ tsp salt
·         Cut chicken into chunks
·         Mix all marinade ingredients in a bowl, mix well with chicken, cover, and leave in fridge at least an hour and ideally overnight.
·         On day of cooking – turn pot to saute mode.  Add a splash of oil.  Add in the onion, cook until softening.  
·         Then add the spices, stir a few minutes until toasted and aromatic.
·         Add chicken chunks in batches, brown them. Remove from pan.
·         Add broth, deglaze
·         Add tomatoes, tomato sauce, and chicken, stir well.  
·         Add trivet and second pan.  In second pan mix all rice ingredients.
·         Switch pan to manual high pressure and set for 5 minutes.  
·         When complete, allow natural pressure release for 10 minutes.
·         Then remove lid and return to saute mode.  Slowly stir in cream and cook until sauce is thickened.
·         Serve over rice.
Experience and results:


Well, this recipe is edible but can definitely use work.

The sauce was far too watery, and by the time I added enough cream to make it at least somewhat thick, it turned out to be an enormous amount of sauce for the amount of chicken.  Also, the chicken ended up tasting/seeming more like it was stewed rather than grilled – breaking up into fairly small pieces and no sense of tasting “browned”.  

As I was cooking it, the initial onion + seasoning mixture cooked to kind of a slurry, so when I put the chunks of chicken in to cook they didn’t really brown at all, they just kind of stewed.  The extra yogurt marinate in the chicken contributed to this effect, and I probably put too much of the chicken mixture in the pan at once.

The flavor of the sauce wasn’t bad – the tomato flavor was a bit brighter than the effect I was going for.  That could be resolved by adding more cream, which I didn’t want to do because it was already too liquid and sooo much sauce.

The pot-in-pot cooking resulted in rice that was delicious.  Note that the amount of rice fully filled the bowl I used.  The overall pot was so full that some of the red sauce from below seemed to have bubbled all the way up to the lid and then dripped down into the rice a bit, which made the rice tinted a bit red and flavored a bit.  Not really a problem.  

For future tries, here are some of the things I’ll change:
  1. More chicken, and instead of cutting it up into small chunks in the marinade, I’ll do bigger chunks (whole tenders) through the browning stage, then cut up the pieces after they’re browned.
  2. Instead of browning the onions and spices first, will brown the chicken first, in smaller batches, and will sort of shake the excess yogurt off the pieces before browning.  That way they can get truly browned.  Once those are done and out of the way, will toss in the onions and spices, and will add the remainder of the yogurt marinade to the mix when I return the chicken pieces to the pot just before pressure-cooking.
  3. Reduce the recipe liquids – skip the half-cup of chicken stock entirely.  Maybe do tomato paste instead of tomato sauce?  
  4. Use real half-and-half instead of whatever was in the fat-free stuff.  I’m afraid whatever they use to thicken the fake stuff breaks down under heat?

A couple of other observations – I bought a tube of ginger paste to use instead of chopping my own ginger or using dried ginger.  This was super-convenient but I think that the couple tsp I put in the recipe (um, is that tsp?  I wonder… maybe I used tablespoons?) was about all that was in the tube.  If so – not a very good value.  So will probably look for larger-quantity prepared fresh stuff, or will convert the recipe to dried ginger.  


And, I bought some whole grain naan from the store which … was perfectly tasty as bread but neither of us felt it really captured what we love about restaurant naan.  Will try a different product or skip that next time.
Design a site like this with WordPress.com
Get started